Sunday, 18 February 2018

Pastel Rainbow Stripes Nails!

Pastel Rainbow Stripes Nails!

Rating: **


Finished Nails
Tools
I used:
  • Barry M 245 Gold
  • Barry M 304 Mint Green
  • Barry M 306 Blueberry I/C
  • Barry M 348 Prickly Pear
  • Miss Sporty 480 Baby Pink
  • Barry M 705 Quick dry top coat
  • Striping tape

Step 1

Paint your nails gold.


Step 2

Put three strips of striping tape across each nail.


Step 3

Paint each section of the nail a different pastel colour. I used green, blue, purple, and pink. I did all the nails the same but you could change the ordering for the ring finger to make it an accent nail if you wanted. Make sure you remove the tape immediately after you have painted the colours either side of it so you don't end up pulling the nail varnish off once it is dry.


Finally, cover your nails in the top coat to protect them.

If you have any suggestions or questions, please email them to nail.art12345@gmail.com or leave a comment below. And don't forget to head over to our Facebook page and hit like!   


Sunday, 24 December 2017

Rudolph Nails!

Rudolph Nails!

Rating: *****

Finished Nails
Tools

I used:
  • Barry M MTNP3 633
  • Kiko 014
  • Rimmel White
  • Collection 2000 Blackjack 2
  • Collection 2000 Berry Hot 19
  • Small paintbrush
  • Small dotting tool

Step 1

Paint your nails silver.


Step 2

Paint a half circle at the tip of each nail.


Step 3

Using the paintbrush, add antlers to the top of each circle.


Step 4

Using the dotting tool, add white circles for the eyes.


Step 5

Using the dotting tool, add slightly smaller black dots in the centre of each white dot.


Step 6

Add half an oval of red at the tip of each nail for the nose.


Finally, cover your nails in the top coat to protect them.

If you have any suggestions or questions, please email them to nail.art12345@gmail.com or leave a comment below. And don't forget to head over to our Facebook page and hit like!  


Sunday, 17 December 2017

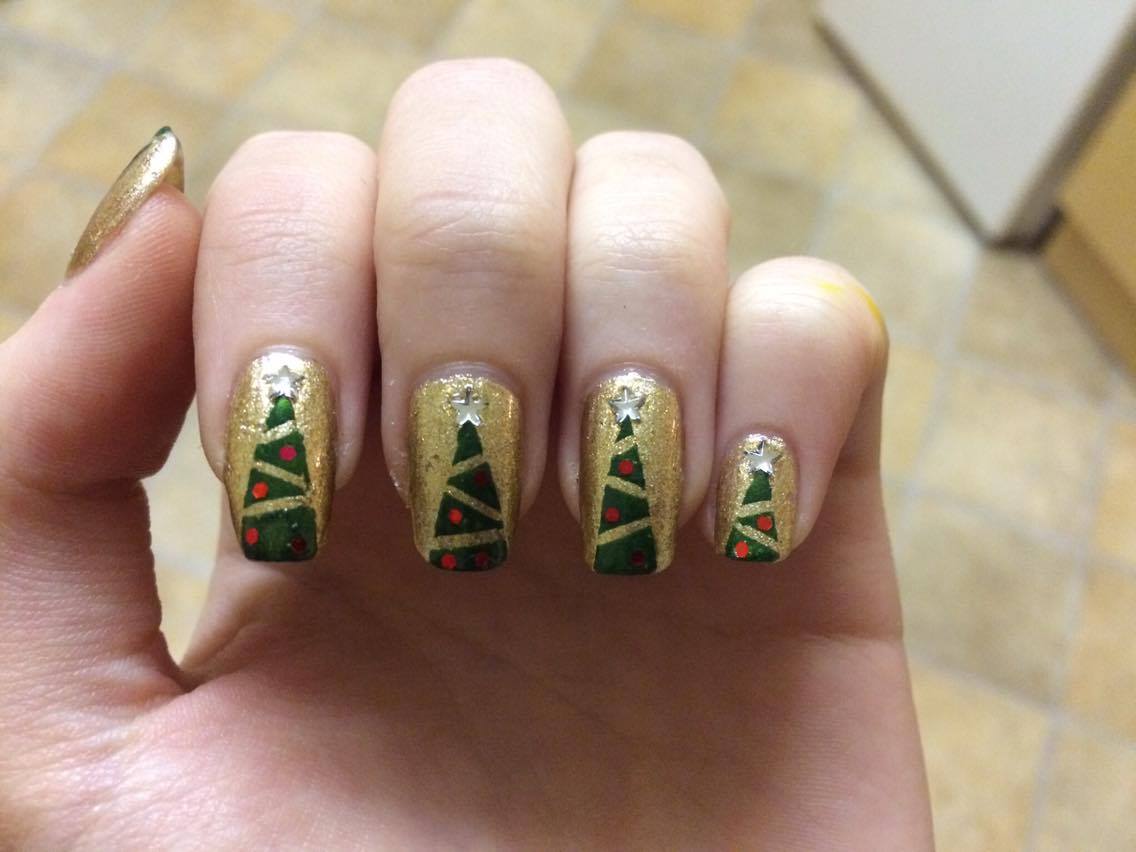
Christmas Tree Nails!

Christmas Tree Nails!

Rating: **

Finished Nails
Tools

I used:
  • Barry M Gold Digger 632
  • PS Green
  • La Femme Top Coat
  • Striping tape
  • Masking tape (not shown)
  • Red glitter 
  • Silver star gems

Step 1 

Paint your nails gold.


Step 2

Use the masking tape to create the triangle for the tree. Then add some diagonal strips of striping tape to make the tinsel. Paint over your nail with the green and remove the tape immediately.


Step 3

Stick a few red glitter pieces on each tree using the top coat, to create baubles.


Step 4

Stick a silver star gem to the top of each tree using a generous blob of top coat.


Finally, cover your nails in a thick layer of the top coat to make sure the stars don't fall off.

If you have any suggestions or questions, please email them to nail.art12345@gmail.com or leave a comment below. And don't forget to head over to our Facebook page and hit like!   


Sunday, 19 November 2017

Grey Half and Half Nails!

Grey Half and Half Nails!

Rating: **

Finished Nails
Tools

I used:
  • Colour Show 73 City Smoke
  • Pinpai black stamping polish
  • Collection 2000 Blackjack 2
  • Barry M 705 Quick dry top coat
  • Small paintbrush
  • Stamp 

Step 1

Paint your nails grey.


Step 2

Cover half of your nail with some tape, and use the stamping polish and the stamp to transfer the design to your nail.


Step 3

Using the paintbrush and the black nail varnish, paint a line down the centre of your nails to neatly finish off the pattern.


Finally, cover your nails in the top coat to protect them.

If you have any suggestions or questions, please email them to nail.art12345@gmail.com or leave a comment below. And don't forget to head over to our Facebook page and hit like!   


Sunday, 5 November 2017

Tigger Nails!

Tigger Nails!

Rating: ****

Finished Nails
Tools

I used:
  • Barry M 629 White
  • Rimmel 452 Chin Up Buttercup
  • Miss Beauty 21 Sunset
  • Miss Sporty 480
  • Collection 2000 Blackjack
  • Barry M 705 Quick dry top coat
  • Make-up sponge
  • Small paintbrush
  • Small dotting tool

Step 1

Paint your nails white.


Step 2

Using the make-up sponge, paint a yellow to orange gradient on all your fingers except the ring fingers.


Step 3

Paint black stripes over the top of the gradients, alternating which side they start from.


Step 4

On the ring fingers, paint a pale pink oval in the middle, slightly below the centre.


Step 5

Paint the top and bottom parts of your nail yellow.


Step 6

Fill in the remaining white sections on the ring fingers with orange.


Step 7

Add eyes using the dotting tool, and eyebrows and whiskers using the paintbrush to the face.


Finally, cover your nails in the top coat to protect them.

If you have any suggestions or questions, please email them to nail.art12345@gmail.com or leave a comment below. And don't forget to head over to our Facebook page and hit like!  


Sunday, 22 October 2017

Graveyard Nails!

Graveyard Nails!

Rating: ***

Finished Nails
Tools

I used:

  • Barry M 629 Matte White
  • Barry M 634 Black
  • Colour Cosmetic 07
  • Barry M Matte Top Coat
  • Make-up sponge
  • Small paintbrush

Step 1

Paint your nails white.


Step 2

Using the make-up sponge and the black and white nail varnishes, paint a gradient on your nails, with black at the tips.


Step 3

Using the paintbrush, paint gravestones on the tips of your nails. 


Step 4

Cover the nails in the matte top coat to protect them.


If you have any suggestions or questions, please email them to nail.art12345@gmail.com or leave a comment below. And don't forget to head over to our Facebook page and hit like!  

Sunday, 8 October 2017

Autumn Glitter Gradient!

Autumn Glitter Gradient

Rating: *

Finished Nails
Tools
I used:
  • La Femme Gold
  • Miss Sporty 063
  • La Femme Jupiter 84
  • Barry M 705 Quick dry top coat
  • Make-up sponge

Step 1

Using the makeup sponge, dab the gold glitter onto each nail, making it thick at the tip and fading up to nothing at the base of the nail.


Step 2

Using the makeup sponge, dab the orange over the top of the gold, stopping further from the tip than you did with the gold. 


Step 3

Using the makeup sponge again, dab the red over the top of the orange, stopping even further from the tip than with the previous two colours.


Finally, cover your nails in the top coat to protect them.

If you have any suggestions or questions, please email them to nail.art12345@gmail.com or leave a comment below. And don't forget to head over to our Facebook page and hit like!