Showing posts with label glitter nails. Show all posts

Sunday, 4 November 2018

Pink Lacy Nails!

Pink Lacy Nails!

Rating: **

Finished Nails!
Tools

I used:
  • Barry M 629 Matte White
  • L.A. Girls Gel Pink
  • Barry M Blackjack
  • Pinpai Black Stamping Polish
  • Claires Silver Glitter
  • Cairuo Top Coat
  • Barry M Matte Top Coat
  • Sponge
  • Small paintbrush
  • Small and medium dotting tools
  • Lace design stamper

Step 1

Using the sponge, paint a gradient on your nails from dark pink at the tips to white at the base.


Step 2

Using the paintbrush, paint 3 thick black lines running the length of your thumb and ring finger nails.


Step 3

Use the stamper to print the lace design onto your first and little finger nails.


Step 4

Paint your middle finger with the silver glitter.


Step 5

Using the dotting tools, put one large dot in the middle of your middle finger, near the base, and add 3 smaller ones either side of it.


Finally, cover all your nails, except the glittery one, in the matte top coat to protect them. Cover the glittery nails in the regular top coat.

If you have any suggestions or questions, please email them to nail.art12345@gmail.com or leave a comment below.
And don't forget to head over to our Facebook page and hit like or follow us on Instagram!


Sunday, 18 March 2018

Black 'n' Silver Nails!

Black 'n' Silver Nails!

Rating: ***


Finished nails
Tools

I used:
  • Collection 2000 Blackjack 2
  • Barry M MNTP3 633
  • Primark Mini Silver Glitter
  • Colour Cosmetic 07 Top Coat
  • Silver glitter
  • Small paintbrush 

Step 1

Paint your nails black.


Step 2

Using the paintbrush, paint curved silver lines on your nails.


Step 3

Fill in some of the gaps between the silver lines with the glitter nail polish. You could use the paintbrush or the nail polish brush itself.


Step 4

Using the top coat, stick some silver glitter dots to the silver lines. You may wish to use tweezers to position the dots and ensure they are pushed down onto the nail completely.


Finally, cover your nails in a thick layer of top coat to protect them and make sure the glitter doesn't fall off.

If you have any suggestions or questions, please email them to nail.art12345@gmail.com or leave a comment below. And don't forget to head over to our Facebook page and hit like!   


Sunday, 17 December 2017

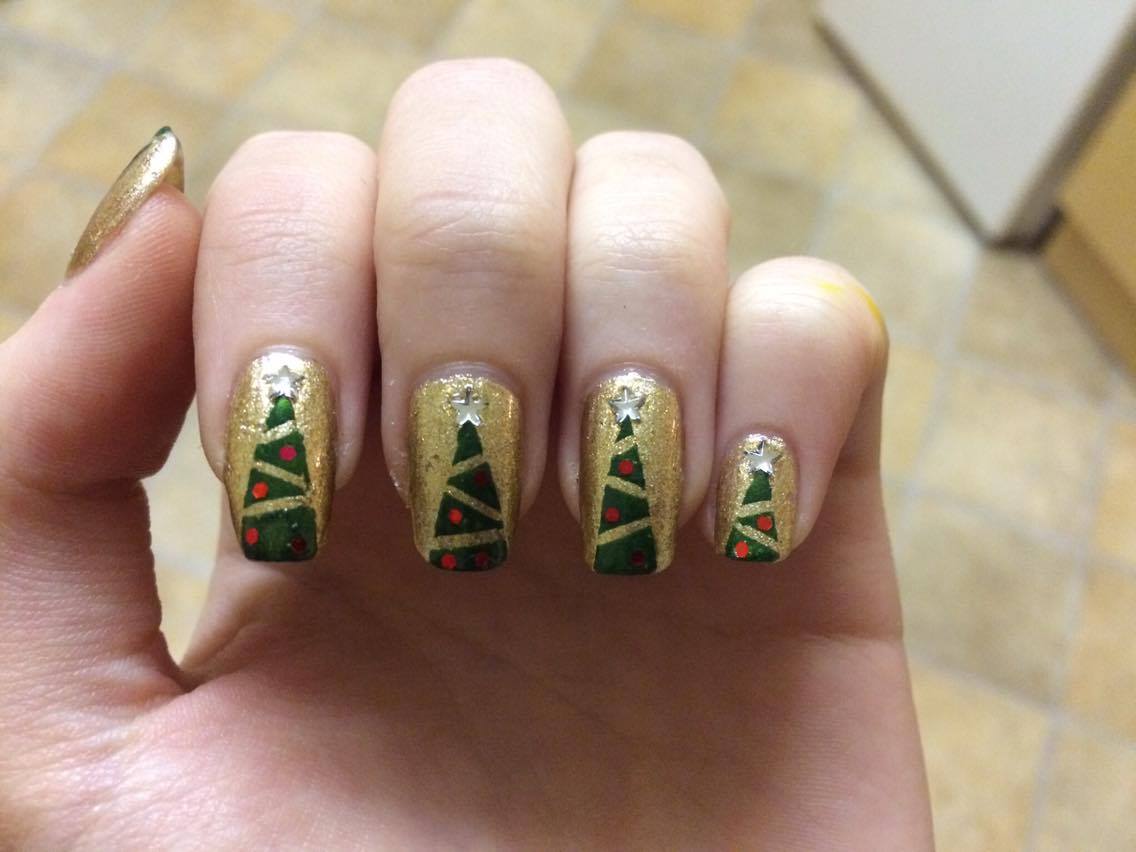
Christmas Tree Nails!

Christmas Tree Nails!

Rating: **

Finished Nails
Tools

I used:
  • Barry M Gold Digger 632
  • PS Green
  • La Femme Top Coat
  • Striping tape
  • Masking tape (not shown)
  • Red glitter 
  • Silver star gems

Step 1 

Paint your nails gold.


Step 2

Use the masking tape to create the triangle for the tree. Then add some diagonal strips of striping tape to make the tinsel. Paint over your nail with the green and remove the tape immediately.


Step 3

Stick a few red glitter pieces on each tree using the top coat, to create baubles.


Step 4

Stick a silver star gem to the top of each tree using a generous blob of top coat.


Finally, cover your nails in a thick layer of the top coat to make sure the stars don't fall off.

If you have any suggestions or questions, please email them to nail.art12345@gmail.com or leave a comment below. And don't forget to head over to our Facebook page and hit like!   


Sunday, 8 October 2017

Autumn Glitter Gradient!

Autumn Glitter Gradient

Rating: *

Finished Nails
Tools
I used:
  • La Femme Gold
  • Miss Sporty 063
  • La Femme Jupiter 84
  • Barry M 705 Quick dry top coat
  • Make-up sponge

Step 1

Using the makeup sponge, dab the gold glitter onto each nail, making it thick at the tip and fading up to nothing at the base of the nail.


Step 2

Using the makeup sponge, dab the orange over the top of the gold, stopping further from the tip than you did with the gold. 


Step 3

Using the makeup sponge again, dab the red over the top of the orange, stopping even further from the tip than with the previous two colours.


Finally, cover your nails in the top coat to protect them.

If you have any suggestions or questions, please email them to nail.art12345@gmail.com or leave a comment below. And don't forget to head over to our Facebook page and hit like!    


Sunday, 16 July 2017

Holographic Heart Nails!

Holographic Heart Nails!

Rating: **


Finished Nails
Tools

I used:
  • Holo Glitter 052
  • Collection 2000 5 Fire Engine Red 
  • Colour Cosmetic 07 Top Coat
  • Make-up sponge
  • Small paint brush

Step 1

Paint your nails silver. This polish is particularly thin, so I used a make-up sponge to make sure I got the high density sparkles you see here.


Step 2

With the paintbrush, paint heart on your nails in red. Paint some filled in hearts and some hollow ones.


Finally, cover your nails in the top coat to protect them

If you have any suggestions or questions, please email them to nail.art12345@gmail.com or leave a comment below. And don't forget to head over to our Facebook page and hit like!  

Sunday, 23 April 2017

Oceanic Nails!

Oceanic Nails!

Rating: **


Finished Nails
Tools


I used:

  • Barry M 530 Pacific
  • Liquid Latex
  • Barry M 630 Masquerade
  • Color Cosmetic 07
  • Sponge (not shown)

Step 1

Paint your nails blue.


Step 2

Cover the nail with the liquid latex, except the part where you want the swirl. Then sponge over the whole nail with the sparkly nail varnish and immediately remove the liquid latex.


Finally, cover the nails in a top coat to protect them

If you have any suggestions or questions, please email them to nail.art12345@gmail.com or leave a comment below. And don't forget to head over to our Facebook page and hit like! 

Sunday, 25 September 2016

Turtle Nails!

Turtle Nails

Rating: **


Finished Nails
Tools

I used:

  • Rimmel 819 Green With Envy
  • Barry M 246 Aqua Glitter
  • Colour Cosmetic 07 Top Coat
  • Printed paper turtle

Step 1

Paint your nails white.


Step 2

Paint your nails with the Rimmel blue.


Step 3

Paint all your nails, except the one you will put the turtle on, with the Barry M sparkly blue.


Step 4

Paint your last nail with the sparkly blue and immediately place the paper turtle onto the wet nail varnish. You will need to keep pressing it down to make sure it stays on and you don't end up with a foot poking up when it is dry!


Finally, cover your nails in the top coat. Make sure it is nice and thick over the turtle. 
If you have any suggestions or questions, please email them to nail.art12345@gmail.com or leave a comment below. And don't forget to head over to our Facebook page and hit like!  


Sunday, 21 August 2016

Purple Glittery Diamond French Tip Nails

Purple Glittery Diamond French Tip Nails!

Rating: **

Finished Nails
Tools
I used
  • Maybelline Purple Reflect Violet Profound 840
  • Rimmel Space Dust 006 Moon walking
  • LM Nail Polish 7
  • Thin tape
  • Make-up sponge

Step 1

Paint your nails with the purple nail varnish.


Step 2

Stick the tape in the following pattern on your nails.


Step 3

Using the make-up sponge, dab the glitter across the tips of your nails, making it denser closer to the tip. Remove the tape immediately in the reverse order to the order you put it on.


Finally, cover your nails in the top coat to protect them.

If you have any suggestions or questions, please email them to nail.art12345@gmail.com or leave a comment below. And don't forget to head over to our Facebook page and hit like!  


Sunday, 14 August 2016

Blue and Gold French Mani Nails

Blue and Gold French Mani Nails

Rating: *


Finished Nails
 
Tools
I used:
  • Collection 2000 12 Blue My Mind
  • Barry M 245
  • La Femme Gold Glitter 86
  • LM Nail Polish 7
  • Make-up Sponge

Step 1

Paint your nails blue. You might want to use a base coat to stop your nails staining, and you will need at least 2 coats of the blue.


Step 2

Using the make-up sponge, dab some of the Barry M gold onto the tips of your nails.


Step 3

Using the make-up sponge, dab some of the La Femme Glitter over the top of the gold.


Finally, cover your nails in the top coat to protect them.


If you have any suggestions or questions, please email them to nail.art12345@gmail.com or leave a comment below. And don't forget to head over to our Facebook page and hit like!  


Sunday, 7 August 2016

Spotty Christmas Nails!

Spotty Christmas Nails!

Rating: **

Another really belated Christmas design..!


Finished Nails
Tools

I used:

  • Collection 2000 19 Berry Hot
  • LM Nail Polish 58
  • LM Nail Polish 79
  • LM Nail Polish 7
  • Dotting tool
  • Paintbrush 

Step 1

Paint your nails red. You will probably want a base coat underneath this to protect your nails from being stained.


Step 2

Paint a small bit of glitter at the tip of each nail. Make it thicker at one end than the other.


Step 3

Using the paintbrush, paint a thin white line along the top of the glitter. It should only touch one edge of your nail.


Step 4

Using the dotting tool, paint a row of white dots along the top of the line.


Finally cover the design in a top coat to protect it.

If you have any suggestions or questions, please email them to nail.art12345@gmail.com or leave a comment below. And don't forget to head over to our Facebook page and hit like!