Showing posts with label Xmas nails. Show all posts

Sunday, 24 December 2017

Rudolph Nails!

Rudolph Nails!

Rating: *****

Finished Nails
Tools

I used:
  • Barry M MTNP3 633
  • Kiko 014
  • Rimmel White
  • Collection 2000 Blackjack 2
  • Collection 2000 Berry Hot 19
  • Small paintbrush
  • Small dotting tool

Step 1

Paint your nails silver.


Step 2

Paint a half circle at the tip of each nail.


Step 3

Using the paintbrush, add antlers to the top of each circle.


Step 4

Using the dotting tool, add white circles for the eyes.


Step 5

Using the dotting tool, add slightly smaller black dots in the centre of each white dot.


Step 6

Add half an oval of red at the tip of each nail for the nose.


Finally, cover your nails in the top coat to protect them.

If you have any suggestions or questions, please email them to nail.art12345@gmail.com or leave a comment below. And don't forget to head over to our Facebook page and hit like!  


Sunday, 17 December 2017

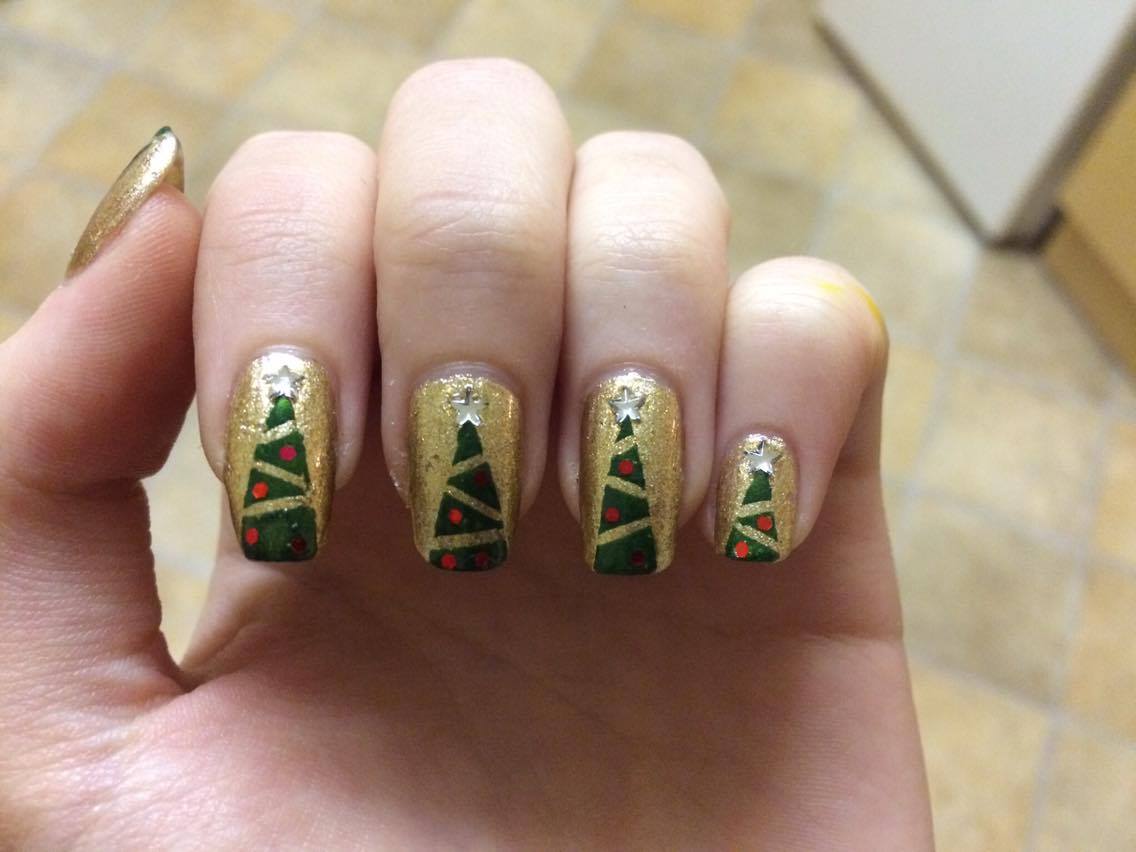
Christmas Tree Nails!

Christmas Tree Nails!

Rating: **

Finished Nails
Tools

I used:
  • Barry M Gold Digger 632
  • PS Green
  • La Femme Top Coat
  • Striping tape
  • Masking tape (not shown)
  • Red glitter 
  • Silver star gems

Step 1 

Paint your nails gold.


Step 2

Use the masking tape to create the triangle for the tree. Then add some diagonal strips of striping tape to make the tinsel. Paint over your nail with the green and remove the tape immediately.


Step 3

Stick a few red glitter pieces on each tree using the top coat, to create baubles.


Step 4

Stick a silver star gem to the top of each tree using a generous blob of top coat.


Finally, cover your nails in a thick layer of the top coat to make sure the stars don't fall off.

If you have any suggestions or questions, please email them to nail.art12345@gmail.com or leave a comment below. And don't forget to head over to our Facebook page and hit like!   


Sunday, 7 August 2016

Spotty Christmas Nails!

Spotty Christmas Nails!

Rating: **

Another really belated Christmas design..!


Finished Nails
Tools

I used:

  • Collection 2000 19 Berry Hot
  • LM Nail Polish 58
  • LM Nail Polish 79
  • LM Nail Polish 7
  • Dotting tool
  • Paintbrush 

Step 1

Paint your nails red. You will probably want a base coat underneath this to protect your nails from being stained.


Step 2

Paint a small bit of glitter at the tip of each nail. Make it thicker at one end than the other.


Step 3

Using the paintbrush, paint a thin white line along the top of the glitter. It should only touch one edge of your nail.


Step 4

Using the dotting tool, paint a row of white dots along the top of the line.


Finally cover the design in a top coat to protect it.

If you have any suggestions or questions, please email them to nail.art12345@gmail.com or leave a comment below. And don't forget to head over to our Facebook page and hit like!   


Sunday, 31 July 2016

Christmas Glitter Tips!

Christmas Glitter Tips!

Rating: ***

A little bit late for Christmas but better late than never!


Finished Nails
Tools


I used:

  • Collection 2000 Top Coat Sparkle with Gloss Enhancer
  • Barry M 245
  • 17 Green
  • La Femme Jupiter 84 
  • LM Nail Polish 7
  • Tape
  • Star shaped gems 

Step 1

Paint your nails with the sparkly top coat.


Step 2

Stick the tape across the top half of your nail, diagonally, and paint the tips with the gold. Remove the tape immediately to avoid peeling or stretching the nail varnish.


Step 3

Paint over the gold parts with the green glitter. There is no need to use tape for this step as it doesn't need to be perfect.


Step 4

Paint over this again but with the red glitter. Again, there is no need to use tape.


Step 5

Cover the whole design in the top coat, and then stick a small star in the top corner of each nail.


Finally, cover the whole design in another top coat, making it quite thick, to ensure the star doesn't fall off.

If you have any suggestions or questions, please email them to nail.art12345@gmail.com or leave a comment below. And don't forget to head over to our Facebook page and hit like!   


Wednesday, 17 February 2016

Candy Canes!


Candy Canes!

Rating: ****


Finished Nails


Tools
I used:


  • Barry M Cotton 505
  • Collection 2000 Berry Hot 19
  • Unknown
  • H&M Super Glitter
  • La Femme 118 Top Coat
  • Paintbrush

Step 1

Paint your nails white.


Step 2

Paint red streaks across your nails using the paintbrush. Don't make the edges straight, give them a little bit of curve. One main stripe across the middle and a small one at the tip works nicely.


Step 3

Using the paintbrush, paint green lines either side of the red stripes. Also add one or two thin lines on the white sections. Again, don't make these lines completely straight.


Finally cover the design in a top coat to smooth it out and protect it.

If you have any suggestions or questions, please email them to nail.art12345@gmail.com or leave a comment below. And don't forget to head over to our Facebook page and hit like!   


Sunday, 30 November 2014

Snowflake Nails!

Snowflake Nails!

Rating: *

Finished Nails
Tools
I used:
  • Rimmel 60 Seconds 703 White Hot Love
  • 17 Seabreeze
  • Barry M Silver Nail Art Pen
  • Rimmel Finishing Touch Ultra Shine Top Coat

Step 1

Paint your nails white.


Step 2

Paint your nails blue.


Step 3

Using the nail art pen, draw three lines that cross at the centre of your ring fingers.


Step 4

At the end of each line, add two smaller lines to turn it into a snowflake.


Step 5

Cover the design in a top coat so the pen doesn't rub off, and to give it a nice shine.


If you have any suggestions or questions, please email them to nail.art12345@gmail.com or leave a comment below. And don't forget to head over to our Facebook page and hit like! 


Sunday, 1 December 2013

Star nails!

Star Nails!
(A perfect design to kick off advent)

Rating: *

Finished Nails
Tools
I used:
  • '17 Navy Glint'
  • 'Models Own Silver'
  • Salon Express Stamper
  • 'Collection 2000 Nail Care Top Coat'

Step 1

Paint the nails with the navy blue. This may require two coats to achieve the desired effect of midnight blue sky.

Step 2

Use the star stamper to place a silver star in the corner of each nail. I only used the biggest of the stars in this cluster because I thought any more would look over crowded.


Step 3

Cover the design in the top coat to seal in the design and prevent chips.


If you have any suggestions or questions, please email them to nail.art12345@gmail.com or leave a comment below 


Sunday, 27 January 2013

Snowman Nails!

Snowman nails!

Rating: ****


Finished nails
Tools

I used:
  • 'Maybelline 825 Oh So Close'
  • 'Nail Art Pen White'
  • 'Model's Own Pen Black'
  • 'Nail Art Pen Orange'
  • 'Rimmel Lasting Finish 198 Azure'
  • '17 Fury'
  • 'Collection 2000 Nail Care Top Coat'
  • A small, metal banded paintbrush (plastic would dissolve!) - I used size 10/0
  • Nail varnish remover
  • A tissue

Step 1

Paint your nails silver. Don't worry if it is messy, you can clean it up at the end either with a cotton bud and nail varnish remover or you can peel it off!


Step 2

Paint a free-hand line across the bottom of your nail using the white nail art varnish. Make it a little bumpy so it looks like snow covered ground.


Step 3

Using a paint brush, paint a large white circle to one side of your nail, resting on the white line. 


Step 4

Using a paintbrush, paint a smaller white circle on top of the large circle. You may have to repeat steps 3 and 4 to make the circles darker.


Step 5

Using the black nail art pen, paint a hat on top of the smaller circle. Start with the line across, then draw the outline of the hat and finally fill it in.


Step 6

Using the black nail art pen, add in the eyes and buttons on each of the snowmen.


Step 7

Using the orange nail art pen, draw an elongated triangle under the eyes for the nose. You could use a paintbrush as this gives it more of a point.


Step 8

Using a paintbrush, paint in a scarf on each of the snowmen. You can use any colours you like - I chose to use alternating gold and blue. 


Step 9

Using the white nail art pen, add in small dots surrounding each snowman.


Step 10 

Paint over each nail with the top coat to seal in the design.


Finally, clean up around the nails to make them look neat.

If you have any suggestions or questions, please email them to nail.art12345@gmail.com or leave a comment below