Tuesday 25 December 2012

Penguin nails!

Penguin Nails!

Rating: ****

Finished nails

Tools

I used:
  • 'Rimmel Lasting Finish 080 Black Cab'
  • 'Collection 2000 Manicure 103 French White'
  • 'Miss Beauty No. 21 Sunset'
  • 'Collection 2000 Nail Care Top Coat'
  • Nail Varnish remover
  • A dotter made from a hairbrush
  • A small, metal banded paintbrush (plastic would dissolve!)
  • A tissue
Step 1

Paint the nails black.  Don't worry if it is messy, you can clean it up at the end either with a cotton bud and nail varnish remover or you can peel it off!


Step 2

Paint half an oval at the tip of the nail using the white.


Step 3

Above the half oval paint two smaller ovals using the white. 


Step 4

On the large half oval, paint a small triangle with the point down near the top and two semi circles at the bottom using the orange.


Step 5

Paint two small black dots towards the bottom of the top ovals for the eyes


Step 6

Paint over each nail with the top coat to seal in the design.
Finally, clean up around the nails to make them look neat.
Merry Christmas everyone!
 
If you have any suggestions or questions, please email them to nail.art12345@gmail.com or leave a comment below


Monday 24 December 2012

Ribbon nails!

Ribbon Nails!

Rating: *

Finished nails

Tools

I used:
  • 'Maybelline New York 820 Winner Takes It All'
  • 'Collection 2000 Nail Care Top Coat'
  • Red and Green ribbon with gold dots on

Step 1

Paint your nails gold. Don't worry if it is messy, you can clean it up at the end either with a cotton bud and nail varnish remover or you can peel it off!


Step 2

 Paint clear nail varnish on the back of a short piece of ribbon and stick it to the nail. Make sure it sticks over the end and then cut it so it is flush with the end of your nail. 


Step 3

Cover the design with a thick top coat to ensure the ribbon doesn't fall off.


Finally, clean up around the nails to make them look neat.
Merry Christmas everyone!
 
If you have any suggestions or questions, please email them to nail.art12345@gmail.com or leave a comment below


Friday 21 December 2012

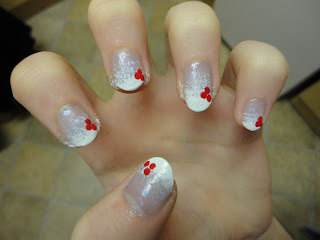
Holly Berry nails!

Holly Berry nails!


 Rating: ***

Finished nails
Tools
I used:
  • 'Star Gazer Ultra Cover Nail Polish 304'
  • 'Rimmel Lasting Finish 030 Double Decker Red'
  • 'Collection 2000 103 French White'
  • 'Barry M 290 Spring Green'
  • 'Collection 2000 Nail Care Top Coat'
  • A small, metal banded paintbrush (a plastic one would dissolve!)
  • A small dotter tool
  • A sponge
  • Nail Varnish remover
  • A tissue

 Step 1

Paint your nails with the sparkly blue nail polish. Don't worry if it is messy, you can clean it up at the end either with a cotton bud and nail varnish remover or you can peel it off!


Step 2

Using an old sponge, dab white nail varnish over the tips of each nail


Step 3

Using the dotter tool, place 3 small red dots in the corner of each nail


Step 4

Using the paintbrush, paint two leaves with the green nail varnish; one each side of the berries.


Step 5

Paint over the design with a top coat to seal it in. 


Finally, clean up around the nails to make them look neat.

Merry Christmas everyone!
 
If you have any suggestions or questions, please email them to nail.art12345@gmail.com or leave a comment below