Showing posts with label wintery nails. Show all posts

Sunday, 8 July 2018

Skier Nails!

Skier Nails

Rating: ****


Finished Nails
Tools


I used:

  • Barry M 306 Blueberry I/C
  • Barry M Blackjack
  • Barry M 629 Matte White
  • Essence Top Coat
  • Masking tape
  • Small paintbrush
  • Small dotting tool

Step 1

Paint your nails blue.


Step 2

Use the masking tape to paint a diagonal white french tip on all your nails.


Step 3

Using the dotting tool, add some white dots to represent snowflakes on the blue part of the nail.


Step 4

Using the paintbrush, paint one or two trees on all nails except your ring finger by painting a black line and then a few diagonal strokes coming off the line. Paint a skier on your ring finger, going down the slope, using the black too.


Step 5

Add a white ski pole to the skier using the paintbrush.


Finally, cover your nails in the top coat to protect them.

If you have any suggestions or questions, please email them to nail.art12345@gmail.com or leave a comment below. And don't forget to head over to our Facebook page and hit like!   


Sunday, 15 April 2018

Blue Spotted Nails!

Blue Spotted Nails!

Rating: *

Finished Nails
Tools

I used:
  • Rimmel 60 Seconds 703 White Hot Love
  • Revlon 050 Surf Spray
  • New Look Deep Navy
  • Rimmel Finishing Touch Ultra Shine Top Coat
  • Small dotting tool (or a skewer)

Step 1

Paint your nails with a base coat to protect them - I used the white for this. Paint all your nails, except the ring finger, with the light blue. I had to use several coats with this nail varnish as it isn't very thick.


Step 2

Paint your ring fingers with the dark blue.


Step 3

Using the dotting tool (or a skewer if you don't have one), paint three dark blue dots down the centre of each of the pale blue nails.


Step 4

Using the dotting tool again (make sure you clean it first) paint three light blue dots down the centre of the dark blue nails.


Finally, cover your nails in the top coat to protect them.

If you have any suggestions or questions, please email them to nail.art12345@gmail.com or leave a comment below. And don't forget to head over to our Facebook page and hit like!   


Sunday, 17 December 2017

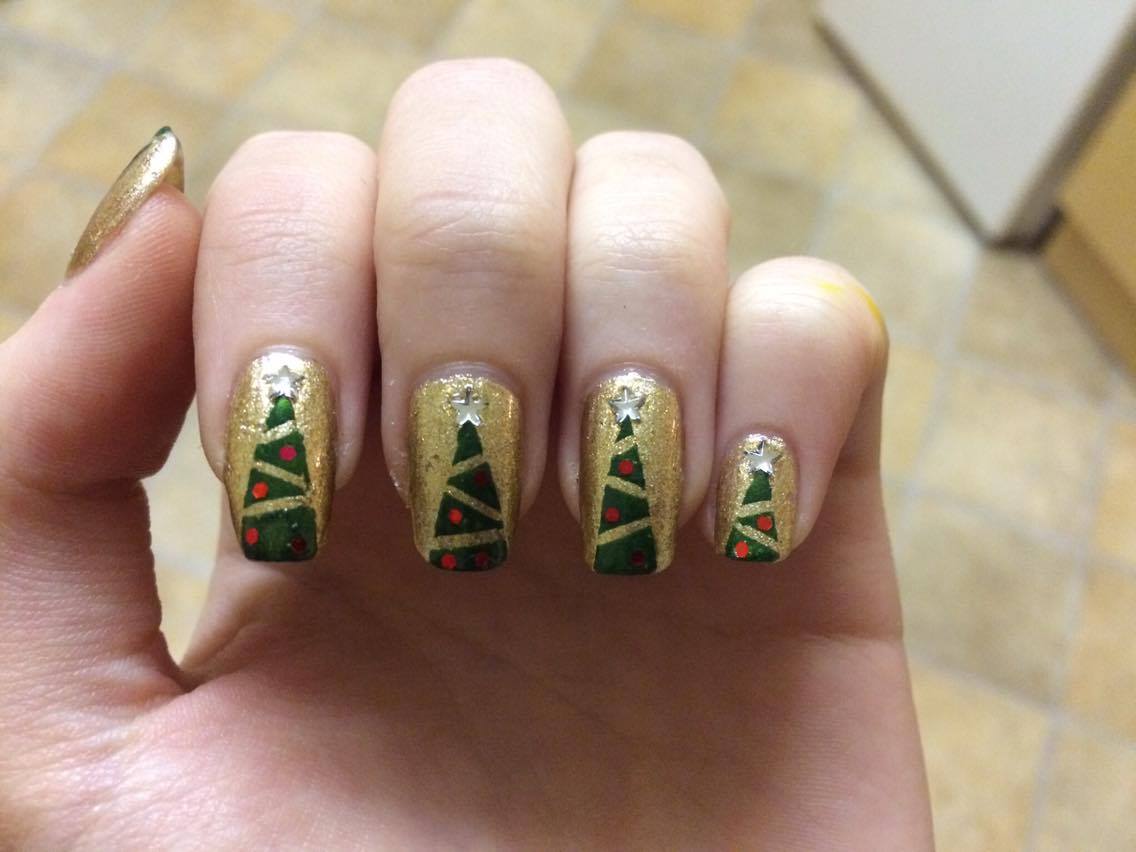
Christmas Tree Nails!

Christmas Tree Nails!

Rating: **

Finished Nails
Tools

I used:
  • Barry M Gold Digger 632
  • PS Green
  • La Femme Top Coat
  • Striping tape
  • Masking tape (not shown)
  • Red glitter 
  • Silver star gems

Step 1 

Paint your nails gold.


Step 2

Use the masking tape to create the triangle for the tree. Then add some diagonal strips of striping tape to make the tinsel. Paint over your nail with the green and remove the tape immediately.


Step 3

Stick a few red glitter pieces on each tree using the top coat, to create baubles.


Step 4

Stick a silver star gem to the top of each tree using a generous blob of top coat.


Finally, cover your nails in a thick layer of the top coat to make sure the stars don't fall off.

If you have any suggestions or questions, please email them to nail.art12345@gmail.com or leave a comment below. And don't forget to head over to our Facebook page and hit like!   


Sunday, 24 September 2017

Blue and White Gradient Nails!

Blue and White Gradient Nails!

Rating: **

Finished Nails
Tools
I used:
  • Barry M 629 Matte White
  • Barry M 306 Blueberry
  • Color Show 661 Ocean Blue
  • Barry M Quick Dry Top Coat 704
  • Striping tape
  • Makeup sponge

Step 1

Paint your nails white. 


Step 2

Stick 3 or 4 pieces of striping tape across your nails. I also find it is a good idea to put liquid latex around your nails when doing gradients as it makes cleaning up your fingers much easier!


Step 3

Using the sponge, paint white, pale blue, and dark blue stripes on it and dab it on each nail to create the gradient. You may need to reapply the varnish a few times for each finger. Once you are happy with the gradient, carefully and quickly peel off the tape in the reverse order you applied it, and the liquid latex if you've used it.


Finally, cover your nails in the top coat to protect them.

If you have any suggestions or questions, please email them to nail.art12345@gmail.com or leave a comment below. And don't forget to head over to our Facebook page and hit like!  


Sunday, 2 July 2017

Black White Wavey Nails!

Black and White Wavey Nails!

Rating: **


Finished Nails
Tools


I used:

  • 633 Silver Lining
  • Collection Blackjack 2
  • Rimmel 730 Porcelein
  • Colour Cosmetic 07 Top Coat
  • Striping brush
  • Dotting tool

Step 1

Paint your nails silver.


Step 2

Using the striping brush, paint two curvy lines from the tip of the nail and two curvy lines from the base of the nail.


Step 3

Using the striping brush, paint white lines either side of the black lines, and then add black dots with the dotting tool.


Finally, cover your nails in the top coat to protect them
If you have any suggestions or questions, please email them to nail.art12345@gmail.com or leave a comment below. And don't forget to head over to our Facebook page and hit like!  


Sunday, 1 February 2015

Blue Gradient Nails!

Blue Gradient Nails!

Rating: *

Finished Nails

Tools

I used:
  • Collection 2000 103 French White
  • Primark Ice Queen
  • Make-up sponge


Step 1

Paint your nails white.


Step 2

Using the sponge, create the gradient. You may have to go over it several times, building up the layers to create the effect you would like.


Finally, cover over the design in a top coat to protect it and smooth it out.

If you have any suggestions or questions, please email them to nail.art12345@gmail.com or leave a comment below. And don't forget to head over to our Facebook page and hit like! 


Sunday, 28 December 2014

Snowflake Nails II!

Snowflake Nails II!

Rating: ***

Finished Nails

Tools

I used:

  • Collection French Mani 322 French Pink
  • Rimmel 60 Seconds 703 White Hot Love
  • Barry M Black Nail Art Pen
  • La Femme Top Coat 118
  • Sponge
  • Circular gems

Step 1

Paint your nails with the nude nail varnish.


Step 2

Using the sponge, dab white onto the tips of your nails, making it fade from the tip upwards.


Step 3

Using the black nail art pen, draw half a snowflake, as described in this previous post, against the cuticle.


Step 4

Paint over the whole nail with the top coat and, while it is still wet, place a gem in the centre of the snowflake. Then, once it has dried, cover it all in another top coat to stop the gem falling off.


If you have any suggestions or questions, please email them to nail.art12345@gmail.com or leave a comment below. And don't forget to head over to our Facebook page and hit like! 

Sunday, 30 November 2014

Snowflake Nails!

Snowflake Nails!

Rating: *

Finished Nails
Tools
I used:
  • Rimmel 60 Seconds 703 White Hot Love
  • 17 Seabreeze
  • Barry M Silver Nail Art Pen
  • Rimmel Finishing Touch Ultra Shine Top Coat

Step 1

Paint your nails white.


Step 2

Paint your nails blue.


Step 3

Using the nail art pen, draw three lines that cross at the centre of your ring fingers.


Step 4

At the end of each line, add two smaller lines to turn it into a snowflake.


Step 5

Cover the design in a top coat so the pen doesn't rub off, and to give it a nice shine.


If you have any suggestions or questions, please email them to nail.art12345@gmail.com or leave a comment below. And don't forget to head over to our Facebook page and hit like! 


Sunday, 22 September 2013

Stripy white tipped nails!

Stripy White Tipped Nails

Rating: *

Finished nails
(Tools picture to follow)

I used:
  •  A clear sparkly nail varnish (the name of which I've forgotten but I think it was quite old...)
  • 'Barry M Nail Art Pen White'

Step 1

Paint your nails with a clear, sparkly nail varnish. You might want to do several coats until you achieve the amount of sparkles you like.


Step 2

Use the nail art pen to draw lines from the tip of the nail up towards the base. Draw them in different directions and don't draw them too long (ie. not more than half the nail). You could paint the tips of your nails (the white section) with the white pen before drawing the lines to neaten up the whole design if you like.


Finally, clean up around the nails and apply a top coat to prevent chips (I didn't and mine had chipped by the next morning).

If you have any suggestions or questions, please email them to nail.art12345@gmail.com or leave a comment below  


Sunday, 27 January 2013

Snowman Nails!

Snowman nails!

Rating: ****


Finished nails
Tools

I used:
  • 'Maybelline 825 Oh So Close'
  • 'Nail Art Pen White'
  • 'Model's Own Pen Black'
  • 'Nail Art Pen Orange'
  • 'Rimmel Lasting Finish 198 Azure'
  • '17 Fury'
  • 'Collection 2000 Nail Care Top Coat'
  • A small, metal banded paintbrush (plastic would dissolve!) - I used size 10/0
  • Nail varnish remover
  • A tissue

Step 1

Paint your nails silver. Don't worry if it is messy, you can clean it up at the end either with a cotton bud and nail varnish remover or you can peel it off!


Step 2

Paint a free-hand line across the bottom of your nail using the white nail art varnish. Make it a little bumpy so it looks like snow covered ground.


Step 3

Using a paint brush, paint a large white circle to one side of your nail, resting on the white line. 


Step 4

Using a paintbrush, paint a smaller white circle on top of the large circle. You may have to repeat steps 3 and 4 to make the circles darker.


Step 5

Using the black nail art pen, paint a hat on top of the smaller circle. Start with the line across, then draw the outline of the hat and finally fill it in.


Step 6

Using the black nail art pen, add in the eyes and buttons on each of the snowmen.


Step 7

Using the orange nail art pen, draw an elongated triangle under the eyes for the nose. You could use a paintbrush as this gives it more of a point.


Step 8

Using a paintbrush, paint in a scarf on each of the snowmen. You can use any colours you like - I chose to use alternating gold and blue. 


Step 9

Using the white nail art pen, add in small dots surrounding each snowman.


Step 10 

Paint over each nail with the top coat to seal in the design.


Finally, clean up around the nails to make them look neat.

If you have any suggestions or questions, please email them to nail.art12345@gmail.com or leave a comment below