Tuesday 25 December 2012

Penguin nails!

Penguin Nails!

Rating: ****

Finished nails

Tools

I used:
  • 'Rimmel Lasting Finish 080 Black Cab'
  • 'Collection 2000 Manicure 103 French White'
  • 'Miss Beauty No. 21 Sunset'
  • 'Collection 2000 Nail Care Top Coat'
  • Nail Varnish remover
  • A dotter made from a hairbrush
  • A small, metal banded paintbrush (plastic would dissolve!)
  • A tissue
Step 1

Paint the nails black.  Don't worry if it is messy, you can clean it up at the end either with a cotton bud and nail varnish remover or you can peel it off!


Step 2

Paint half an oval at the tip of the nail using the white.


Step 3

Above the half oval paint two smaller ovals using the white. 


Step 4

On the large half oval, paint a small triangle with the point down near the top and two semi circles at the bottom using the orange.


Step 5

Paint two small black dots towards the bottom of the top ovals for the eyes


Step 6

Paint over each nail with the top coat to seal in the design.
Finally, clean up around the nails to make them look neat.
Merry Christmas everyone!
 
If you have any suggestions or questions, please email them to nail.art12345@gmail.com or leave a comment below


Monday 24 December 2012

Ribbon nails!

Ribbon Nails!

Rating: *

Finished nails

Tools

I used:
  • 'Maybelline New York 820 Winner Takes It All'
  • 'Collection 2000 Nail Care Top Coat'
  • Red and Green ribbon with gold dots on

Step 1

Paint your nails gold. Don't worry if it is messy, you can clean it up at the end either with a cotton bud and nail varnish remover or you can peel it off!


Step 2

 Paint clear nail varnish on the back of a short piece of ribbon and stick it to the nail. Make sure it sticks over the end and then cut it so it is flush with the end of your nail. 


Step 3

Cover the design with a thick top coat to ensure the ribbon doesn't fall off.


Finally, clean up around the nails to make them look neat.
Merry Christmas everyone!
 
If you have any suggestions or questions, please email them to nail.art12345@gmail.com or leave a comment below


Friday 21 December 2012

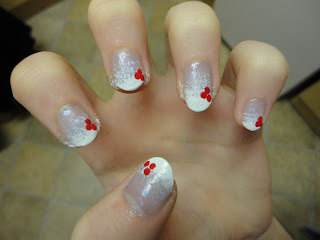
Holly Berry nails!

Holly Berry nails!


 Rating: ***

Finished nails
Tools
I used:
  • 'Star Gazer Ultra Cover Nail Polish 304'
  • 'Rimmel Lasting Finish 030 Double Decker Red'
  • 'Collection 2000 103 French White'
  • 'Barry M 290 Spring Green'
  • 'Collection 2000 Nail Care Top Coat'
  • A small, metal banded paintbrush (a plastic one would dissolve!)
  • A small dotter tool
  • A sponge
  • Nail Varnish remover
  • A tissue

 Step 1

Paint your nails with the sparkly blue nail polish. Don't worry if it is messy, you can clean it up at the end either with a cotton bud and nail varnish remover or you can peel it off!


Step 2

Using an old sponge, dab white nail varnish over the tips of each nail


Step 3

Using the dotter tool, place 3 small red dots in the corner of each nail


Step 4

Using the paintbrush, paint two leaves with the green nail varnish; one each side of the berries.


Step 5

Paint over the design with a top coat to seal it in. 


Finally, clean up around the nails to make them look neat.

Merry Christmas everyone!
 
If you have any suggestions or questions, please email them to nail.art12345@gmail.com or leave a comment below


Sunday 11 November 2012

Spider Webs!

Spider Web Nails!
(A slightly belated Halloween design!)

Rating: **
Finished nails

Tools

I used:
  • 'Rimmel Lasting Finish 080 Black Cab'
  • 'Maybelline New York 825 Oh, So Close'
  • 'Collection 2000 Nail Care Top Coat'
  • A small, metal banded paintbrush (a plastic one would dissolve!)
  • Nail Varnish remover
  • A tissue


 Step 1

Paint your nails black. Don't worry if it is messy, you can clean it up at the end either with a cotton bud and nail varnish remover or you can peel it off!


Step 2

 Paint silver lines coming out of the bottom corner of each nail. Use the nail varnish remover to clean the brush afterwards so the nail varnish doesn't ruin it (see the video in the paw print post for full instructions).


Step 3

Paint silver lines across the nails to make it look like spider webs


Step 4 

Paint over the design with a top coat to seal it in.

Finally, clean up around the nails to make them look neat.
If you would like us to show you how to do crackle nails, please leave a comment below!

If you have any suggestions or questions, please email them to nail.art12345@gmail.com or leave a comment below


Thursday 30 August 2012

Paw Prints!

Paw Print Nails!

Rating: **

 
Finished Nails

Tools

I used:
  • 'Collection 2000 Manicure 103 French White'
  • 'Rimmel Lasting Finish 080 Black Cab'
  • 'Collection 2000 Nail Care Top Coat'
  • Nail Varnish remover
  • A dotter made from a hairbrush
  • A small, metal banded paintbrush (plastic would dissolve!)
  • A tissue

Step 1

Paint your nails white. Don't worry if it is messy, you can clean it up at the end either with a cotton bud and nail varnish remover or you can peel it off!


Step 2

Paint the paw prints on. This step is quite complicated so we made a video to explain it better! (Sorry about the quality; it's quite hard to film over someone's shoulder and the camera wouldn't focus at times!)


(At the moment this video doesn't seem to be available on mobile devices. I'm sorry about that but if anyone can help me solve this problem then email me on nail.art12345@gmail.com or leave a comment below. I have it saved as an MP4 and as a Windows Media Audio/Video file)


Step 3

Paint over each nail with the top coat to seal in the design.


Finally, clean up around the nails to make them look neat.

If you have any suggestions or questions, please email them to nail.art12345@gmail.com or leave a comment below


Friday 17 August 2012

Bumble bees!

Bumblebee nails!

Rating = **
Finished nails

Tools

I used:
  • 'Collection 2000 Manicure 103 French White'
  • 'Maybelline MNY shade 657'
  • 'Collection 2000 Nail Care Top Coat'
  • A cocktail stick
  • 2 printed pictures of bumble bees flying opposite directions

Step 1

Paint your nails white. Don't worry if it is messy, you can clean it up at the end either with a cotton bud and nail varnish remover or you can peel it off!


Step 2

Paint your nails blue. You will need to do 2 coats on all your fingers except your thumbs (only do one coat on them for now)


Step 3

Paint a second coat of blue on your left thumb. Immediately place the left facing bumble bee on top of the wet nail varnish, slightly to the top left of the nail. Press it down so it lies flat. You may wish to use tweezers for this but long nails work just as well. You will need to keep pressing down parts of it, especially the wings as they won't stick immediately. You may need to get a friend to help you with this! Then repeat for the other thumb but place the bee in the top right, facing to the right.


Step 4

Once the bumble bee is stuck down firmly, paint over it with the top coat to seal it in.


Step 5

Dip the cocktail stick in the white nail varnish. You can dip it straight in the bottle or you can place a small drop on a piece of paper or other surface and dip it in to there. Use the cocktail stick to draw small lines across each nail for the trail left by the bee. Try to line up your fingers as below so that the lines all line up. Don't forget to do a line on your thumb too. You may wish to get a friend to paint the lines on your dominant hand (ie. your right hand if you are right handed and vice versa for lefties) as it can be quite hard. You don't need to do the same trail on both hands, it could be different if you wish.


Step 6

Paint over each nail with the top coat to seal in the design.


Finally, clean up around the nails to make them look neat.

If you have any suggestions or questions, please email them to nail.art12345@gmail.com or leave a comment below


Thursday 16 August 2012

Butterfly nails!


Butterfly Nails!

Rating = **


Finished nails

Tools
I used:
  • 'Collection 2000 Manicure 103 French White'
  • 'Rimmel Lasting Finish 030 Double Decker Red'
  • 'Rimmel Lasting Finish 080 Black Cab'
  • 'Collection 2000 Nail Care Top Coat'
  • 3D Nail Seal stickers
  • Sellotape (sorry, I left it out of the picture!)
  • A cocktail stick
  • A dotter made from a hairbrush (it is cheaper!)

Step 1

Paint your nails white. Don't worry if it is messy, you can clean it up at the end either with a cotton bud and nail varnish remover or you can peel it off!


Step 2

Place a piece of sellotape diagonally across half of your nail. Paint the uncovered half red. Carefully peel off the sellotape immediately. Tidy up the line by using the cocktail with a small amount of white nail varnish on it. If you end up with a patch that is a lot thicker than the rest, carefully use the white varnish brush to go over it to make it the same thickness.


Step 3

Carefully peel off a butterfly sticker and place it along the line on your ring finger, on the red side. If you don't have stickers, then you can use a thin brush and the black nail varnish to paint your own butterfly.


Step 4
 
Using the dotter, put 3-5 dots down the line on each finger except the fingers with the butterflies on. Add 2-3 dots behind the butterfly, along the line too.


Step 5

Paint over each nail with the top coat to seal in the design.


Finally, clean up around the nails to make them look neat.

My next post will be Bumble Bees!

If you have any suggestions or questions, please email them to nail.art12345@gmail.com or leave a comment below

(edit: photos updated on 25/10/2014)

Welcome!

Welcome!

 Hi! My name is Katie and I am going to show you some nail art ideas. Some of them will be very simple and others will be a bit more complicated. I will use a scale to show you which are the hardest ones and which are easiest:

* = easiest

*** = medium difficulty 

***** = hardest 

 I will put step-by-step instructions along with pictures for each design so you can try it out for yourself!

Bye!