Sunday, 27 August 2017

Blue White Cross Hatched Nails!

Blue White Cross Hatched Nails!

Rating: *


Finished Nails
Tools
Stamp

I used:
  • 702 Supersonic
  • White stamping polish
  • Barry M Quick Dry Top Coat 704
  • Crossed lines nail stamp

Step 1

Paint your nails with the blue.


Step 2

Using the nail stamping tool, and the white stamping polish, stamp crossed white lines on each nail, making sure you cover each one completely.


Finally, cover your nails in the top coat to protect them.
 
If you have any suggestions or questions, please email them to nail.art12345@gmail.com or leave a comment below. And don't forget to head over to our Facebook page and hit like!  

Wednesday, 16 August 2017

Sunset Beach Nails

Sunset Beach Nails!

Rating: *****

Celebrating 5 years since our first post


Finished Nails
Tools


I used:

  • Seventeen Pink 59628
  • Miss Beauty 21 Sunset
  • Color Show 749 Electric Yellow 
  • Black acrylic paint 
  • Barry M Quick Dry Top Coat 704
  • Make up sponge 
  • Small detailing brush

Step 1

Paint a gradient on your nails with the pink, orange and yellow nail varnishes using the make up sponge.


Step 2

Using the small paintbrush, add a palm tree or two to each nail. To paint the trees, first add a stripe for the trunk then 5 stripes radiating from the top keeping them curving downwards at the tips for the branches. Then carefully add little flecks along each branch for the leaves. Finally add a very rough line for the ground at the base of the tree.


Finally, cover your nails in the top coat to protect them.
 
If you have any suggestions or questions, please email them to nail.art12345@gmail.com or leave a comment below. And don't forget to head over to our Facebook page and hit like!  

Sunday, 30 July 2017

Messy Gradient Nails!

Messy Gradient Nails!

Rating: *


Finished Nails
Tools

I used:
  • Barry M 629 Matte White
  • PS Ice Queen
  • Barry M 306 Blueberry
  • Colour Cosmetic 137
  • Barry M Blue Grape 417
  • Collection 2000 Blue My Mind 12
  • Barry M Quick Dry Top Coat 704

Step 1

Paint your nails white.

Step 2

Using the palest blue, wipe off most of the nail varnish from the brush and drag it across your nail at angles to start the gradient.


Step 3

Repeat step 2 with the next shade of blue across the tips of your nail, making sure you can still see a bit of the palest blue.


Step 4

Repeat step 3 with the third shade of blue.


Step 5

Repeat step 3 with the bright blue.


Step 6

Using the sponge, dab the navy blue along the very tips of your nails.


Finally, cover your nails in the top coat to protect them

If you have any suggestions or questions, please email them to nail.art12345@gmail.com or leave a comment below. And don't forget to head over to our Facebook page and hit like!  


Sunday, 16 July 2017

Holographic Heart Nails!

Holographic Heart Nails!

Rating: **


Finished Nails
Tools

I used:
  • Holo Glitter 052
  • Collection 2000 5 Fire Engine Red 
  • Colour Cosmetic 07 Top Coat
  • Make-up sponge
  • Small paint brush

Step 1

Paint your nails silver. This polish is particularly thin, so I used a make-up sponge to make sure I got the high density sparkles you see here.


Step 2

With the paintbrush, paint heart on your nails in red. Paint some filled in hearts and some hollow ones.


Finally, cover your nails in the top coat to protect them

If you have any suggestions or questions, please email them to nail.art12345@gmail.com or leave a comment below. And don't forget to head over to our Facebook page and hit like!  

Sunday, 2 July 2017

Black White Wavey Nails!

Black and White Wavey Nails!

Rating: **


Finished Nails
Tools


I used:

  • 633 Silver Lining
  • Collection Blackjack 2
  • Rimmel 730 Porcelein
  • Colour Cosmetic 07 Top Coat
  • Striping brush
  • Dotting tool

Step 1

Paint your nails silver.


Step 2

Using the striping brush, paint two curvy lines from the tip of the nail and two curvy lines from the base of the nail.


Step 3

Using the striping brush, paint white lines either side of the black lines, and then add black dots with the dotting tool.


Finally, cover your nails in the top coat to protect them
If you have any suggestions or questions, please email them to nail.art12345@gmail.com or leave a comment below. And don't forget to head over to our Facebook page and hit like!  


Sunday, 18 June 2017

Chequered Chevron Nails!

Chequered Chevron Nails!

Rating: *****


Finished Nails
Tools

Tools:
  • Colletion 2000 5 Fire Engine
  • Black Stamping Polish
  • Cllection 2000 Blackjack 2
  • H&M Sparkling Silver
  • Colour Cosmetic 07 Top Coat
  • Stamping tool
  • Tape
  • Diamond gems
  • Paintbrush

Step 1

Paint your nails red.


Step 2

Using the stamp and the black stamping polish, paint the small squares on the base of your nail. Make sure you cover at least half the nail, but it doesn't need to be precise as you will paint over the tips in a minute.


Step 3

Place a piece of tape over the squares, with a corner in the middle of your nail, and then paint over your nails with the black nail varnish. Remove the tape immediately after painting the nail.


Step 4

Using a paintbrush, paint a silver line along the edge of the black nail varnish.


Step 5

Stick a diamond gem onto the centre of each nail, below the point of the black, using a generous amount of top coat.


Cover your nails in a thick top coat to prevent the gem coming off too easily.

If you have any suggestions or questions, please email them to nail.art12345@gmail.com or leave a comment below. And don't forget to head over to our Facebook page and hit like! 

Sunday, 4 June 2017

Egyptian Necklace Nails!

Egyptian Necklace Nails!

Rating: *


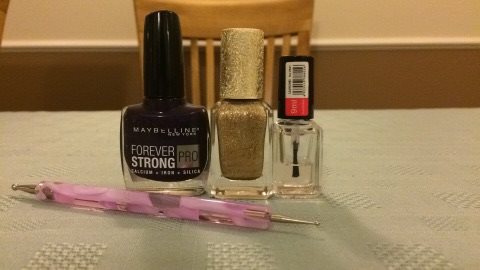
I used:

  • Maybelline 840 Purple Reflect
  • Barry M 245
  • Color Cosmetic 07 Top Coat
  • Dotting tool
  • Detailing brush (not shown)

Step 1

Paint your nails purple.


Step 2

Using the detailing brush, paint a curved gold line at the base of your nail.


Step 3

Using the dotting tool, add a few dots under the line and decreasing dots down from the line.


Finally, cover your nails in the top coat to protect them

If you have any suggestions or questions, please email them to nail.art12345@gmail.com or leave a comment below. And don't forget to head over to our Facebook page and hit like!